Installation Guide
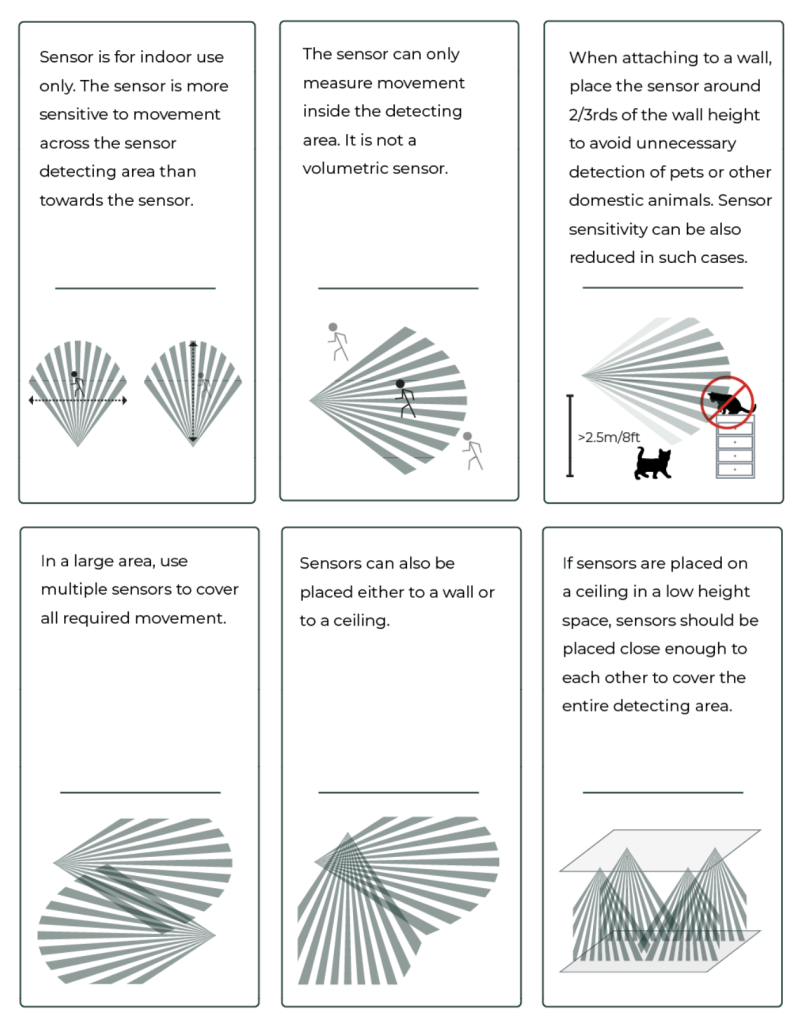
Video Tutorial
Before Installation
- Ensure gateway is operational - Verify Wirepas gateway is installed and connected (LED blinking green)
- Identify the sensor - Scan QR code with Thingsee Toolbox app or QR reader
- Plan sensor placement - Review detection area charts for your installation height
- Select appropriate dome - Choose Visitor Counter or Occupancy dome if needed
Installation Steps
1. Remove Battery Tab
- Carefully pull out the battery security tab
- LED indicator (red) will flash once
- If no LED flash within 2 minutes, tap sensor against palm
- If no events within 5 minutes, re-install batteries
2. Clean Surface
- Clean attachment surface with IPA solvent (isopropyl alcohol)
- Ensure surface is dry before mounting
3. Attach Sensor
- Remove tape’s paper cover from sensor backside
- Push sensor firmly against surface for minimum 5 seconds
- Wipe sensor with dry, clean cloth
Detection Capability
Height-Dependent Detection Area
Thingsee PRESENCE detection capability changes based on installation height. The chart below shows different detection zones at various heights.
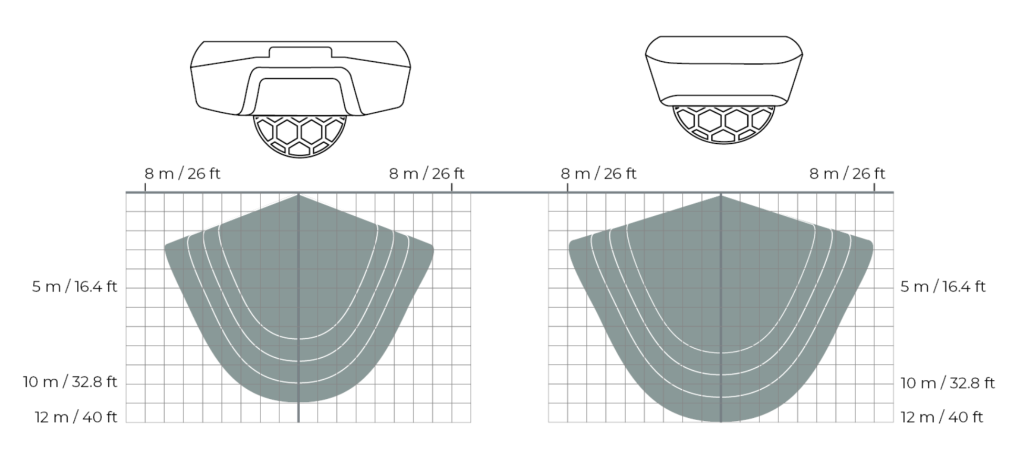
Key Points:
- Detection area is cone-shaped
- Wider coverage at greater distances
- Adjusted sensitivity levels (white lines) shown for illustration
- Detection area changes with sensor sensitivity level
- Maximum 34 movements detected per minute regardless of direction or distance
Visitor Counting Installation
Ceiling Installation
- Place sensor in middle of door opening
- Position 5-10 cm from wall
- Ensure no obstacles between sensor and detection area
- Recommended height: 2.4-2.7m
Door Opening Installation
- Install at top middle of door opening
- Orient sensor according to movement direction
- Ensure clear line of sight to floor
- Avoid direct sunlight exposure
Using Visitor Counter Dome
The Visitor Counter Dome narrows the detection beam for improved counting accuracy:
- Dome narrows detection beam for accuracy
- Detection area is narrowed relative to sensor’s long side
- Can be attached with screws for secure installation
- Attachment clips alone sufficient for most installations
Installation Tips:
- Align dome properly before snapping on
- Ensure dome is fully seated
- Use screws for permanent installations
- Clips work well for temporary or testing setups
Workspace Occupancy Installation
Under-Table Installation
- Install sensor under table as centered as possible
- If table legs present, place sensor on user side of leg
- Maintain 50mm gap between sensor and objects for maintenance access
- Decrease sensitivity to avoid detections outside workspace
- Recommended height: 60-70cm from floor
Using Occupancy Dome
The Occupancy Dome adjusts the detection beam for under-desk use:
- Dome adjusts detection beam for under-desk use
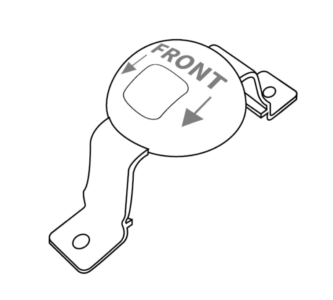
- Orient dome hole facing front for best accuracy
- Can be attached with screws if needed
- Cut off screw attachment parts if using clips only (do not damage clips)
Installation Tips:
- Test detection area after installation
- Adjust sensitivity to focus on workspace only
- Verify no false triggers from nearby walkways
- Consider desk height and user seating position
Installation Guidelines
PIR Technology Considerations
Detection Principle:
- Detects changes in heat sources (moving humans)
- Temperature difference between person and environment affects reliability
- Small temperature differences reduce reliability significantly
Optimal Conditions:
- Environment temperature: 15-25°C
- Person temperature: 36-37°C
- Good thermal contrast required
Factors Affecting Accuracy
Visitor Counting Accuracy Factors:
- Width of doorway (wider = more simultaneous passages)
- People walking side-by-side
- Standing or slowly moving lines
- Cleaning and maintenance activities
- Very slow-moving individuals
Environmental Factors:
- Direct sunlight creates thermal variations
- Heat sources (radiators, HVAC vents) cause false triggers
- Rapid ambient temperature changes reduce sensitivity
- Installation height affects detection area size
Things to Avoid
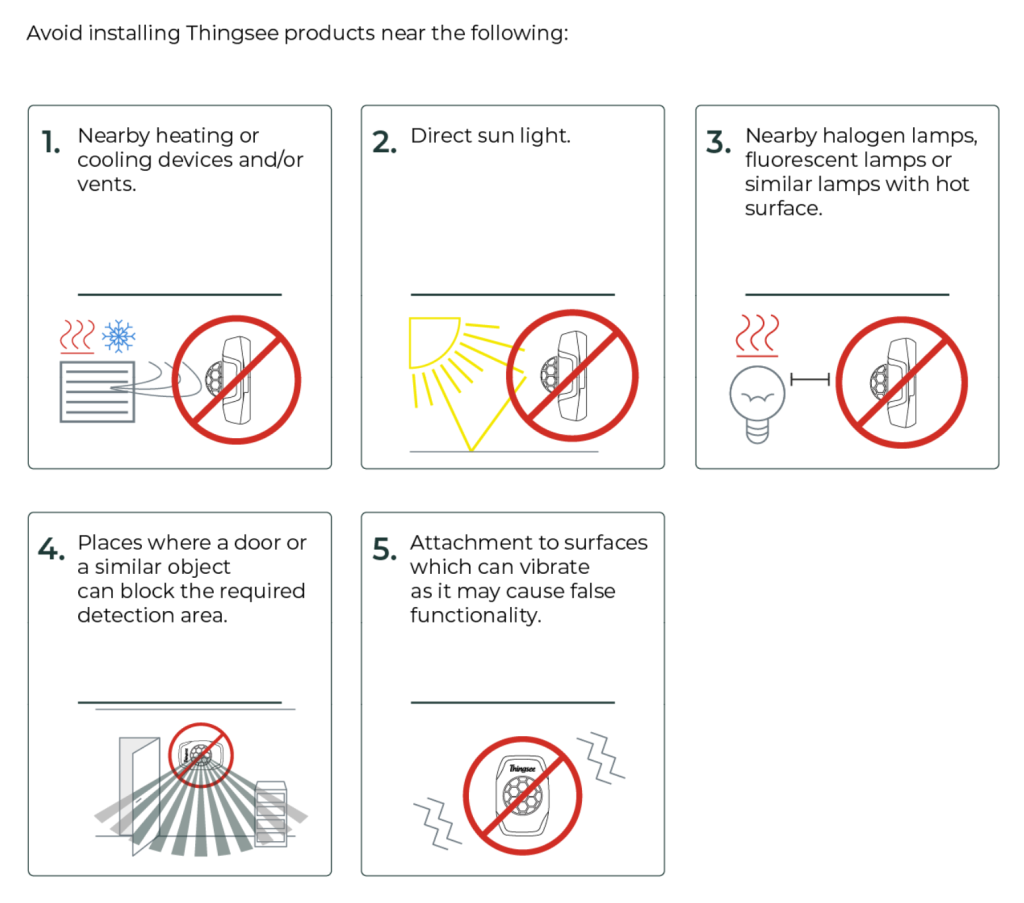
❌ Avoid
- Installation too high - Excessively large detection area
- Direct sunlight exposure - Thermal variations reduce accuracy
- Near heat sources - Radiators, HVAC vents cause false triggers
- High temperature variation areas - Reduces sensor reliability
- Frequent thermal disturbances - Unstable detection
- Too close to traffic flow - People passing very near sensor
- Wide open areas - Unpredictable movement patterns
✅ Optimal Conditions
- Controlled temperature environment - Stable ambient temperature
- Clear detection zone - No obstructions
- Predictable traffic patterns - Consistent movement flows
- Appropriate installation height - Matched to use case
- Good thermal contrast - Clear difference between people and environment
- Protected from sunlight - No direct sun exposure
- Away from heat sources - No radiators or vents nearby
Installation Scenarios
Doorway Visitor Counting
Setup:
- Use Visitor Counter Dome
- Mount at ceiling above doorway center
- Height: 2.4-2.7m
- Position: 5-10cm from wall
Configuration:
- Threshold: 150 (default sensitivity)
- Mode: 0 (Movement count reporting)
- Report interval: 60 seconds
Expected Accuracy: ~85-95% in single-file traffic
Under-Desk Workspace Occupancy
Setup:
- Use Occupancy Dome
- Mount under desk center
- Height: 60-70cm from floor
- Clearance: 50mm from table legs
Configuration:
- Threshold: 800 (reduced sensitivity)
- Mode: 1 (Occupancy reporting)
- Report interval: 300 seconds
Expected Accuracy: ~95% for typical desk usage
Meeting Room Occupancy
Setup:
- No dome required (standard detection)
- Mount on ceiling or wall
- Height: 2.4-3.0m
- Position: Central location with clear view
Configuration:
- Threshold: 150 (default sensitivity)
- Mode: 1 (Occupancy reporting)
- Report interval: 300 seconds
Expected Accuracy: ~90% for typical meeting usage
High-Traffic Corridor Monitoring
Setup:
- Consider Visitor Counter Dome for focus
- Mount on ceiling
- Height: 2.5-3.0m
- Position: Center of corridor width
Configuration:
- Threshold: 100 (increased sensitivity)
- Mode: 2 (Event-based movement count)
- Report interval: 120 seconds
- Passive interval: 7200 seconds
Accuracy: Variable based on corridor width and traffic density
Installation Verification
Testing Procedure
- Enable LED - Configure LED indication for visual feedback
- Set short intervals - Use 10-second report interval for testing
- Walk through detection area - Test coverage systematically
- Observe LED flashes - Verify detection on movement
- Review cloud data - Check messages arriving correctly
- Adjust if needed - Reposition or adjust sensitivity
- Set production config - Disable LED, set normal intervals
Verification Checklist
- LED flashes on battery installation
- Sensor reporting to cloud within 5 minutes
- Movement detected consistently in target area
- No false triggers from adjacent areas
- Detection area matches expectations
- Gateway showing strong signal (RSSI > -70 dBm)
- Configuration applied successfully
Installation Accessories
Visitor Counter Dome
Purpose: Doorways and corridors visitor counting
Features:
- Physically narrows detection beam
- Creates more accurate counting zone
- Reduces false triggers from adjacent areas
- Most effective for doorway widths 0.8-1.2m
Installation:
- Snap onto sensor (clips)
- Optional screw attachment for permanent installations
- Orient according to traffic direction
Occupancy Dome
Purpose: Under-desk workspace occupancy detection
Features:
- Reduces detection area for focused monitoring
- Prevents triggers from nearby walkways
- Essential for under-desk installations
- Allows lower sensitivity settings
Installation:
- Snap onto sensor (clips)
- Orient hole facing front
- Optional screw attachment
- Can cut off screw parts if using clips only
Mounting Considerations
Adhesive Tape:
- Included with sensor
- Sufficient for most installations
- Clean surface with IPA before application
- Press firmly for 5+ seconds
Screw Mounting (Domes):
- Use correct screw type for surface
- Don’t over-tighten (risk damaging dome)
- Provides more secure attachment
- Recommended for high-ceiling installations
Post-Installation
Initial Monitoring
Monitor sensor performance for 24-48 hours after installation:
- Check message frequency - Verify expected reporting intervals
- Review detection counts - Validate accuracy against known traffic
- Monitor battery level - Ensure normal power consumption
- Verify network connectivity - Check RSSI and hop count
- Adjust if needed - Fine-tune sensitivity or position
Documentation
Record installation details:
- Installation date and technician
- Sensor serial number and location
- Configuration settings applied
- Dome type (if used)
- Expected traffic patterns
- Any special considerations
Related Documentation
- Operation Guide - Operating modes and messages
- Configuration Reference - All configuration parameters
- Troubleshooting - Common installation issues
- Technical Specifications - Complete technical specs
- CBOR to JSON Conversion - Message decoding